Showing posts with label Obsession. Show all posts

Monday, July 27, 2015

Today's Look- In the Nude

Ok, so I'm not actually "nude" but I'm LOVING this sexy little two piece number I got from J Bee boutique. I'm currently obsessed with crop tops and this nude color makes for a chic silhouette that is so versatile. (Just wishing I was a bit more tan :) Perfect look for girls night or date night ;)


            CropTopSet JBeeboutique/ Shoes JustFab/ Ring CharmingCharlies/ Necklace CharmingCharlies/ Sunglasses Prada

Stay classy!
Xx,

Tuesday, January 27, 2015

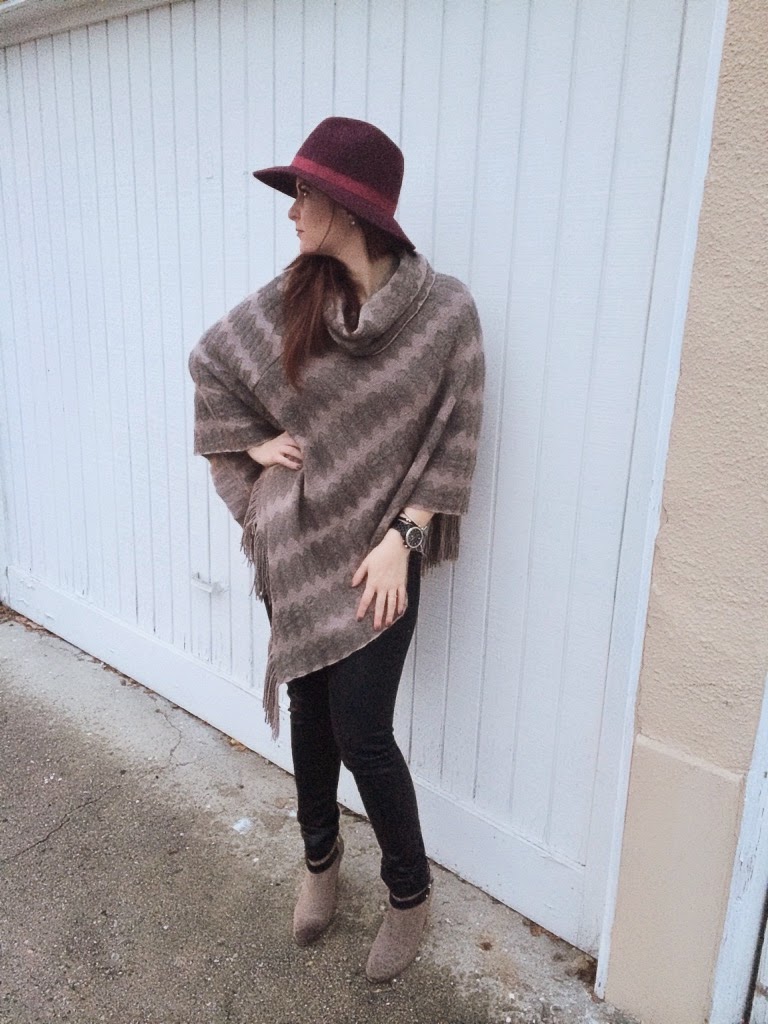
Today's Look- Viva La Poncho!


This winter I became obsessed with wearing this baby. My boyfriend told me it was like I was wearing a "snuggie," which is exactly how it feels! Except it's more like wearing a chic/stylish blanket around:) Rock it lounging around the house, or dress it up with great boots and skinny pants for a night out. I love this poncho even more because I got it from Marshall's for only $25!! 


Pancho Marshalls/ Hat BCBG (from Marshall's)/ Pants Nordstrom/ Boots Express/ Watch Michael Kors/ Bracelet Charming Charlies/ Bracelet Stella Valle


Stay classy
Xx,

Thursday, September 4, 2014

No More Chipped Nails!!

I have been super excited to write this particular blog post because I am absolutely OBSESSED and impressed (I know, I say this about everything) with Sally Hansen's Gel Polish Manucure Kit! Sally is my girl and she has got it right with this kit. 

Okay, before I get too excited, it is a bit on the pricey side. I know that may scare you away but if you're like me and you hate..no..LOATHE chipped nails, this is a kit for you! I love to paint my nails. I find it quite therapeutic and relaxing actually, but when I see a chip, especially if it's the next day or two, I get annoyed, antsy, and just re-do them. 

Because of this, I recently started getting gel manicures. You see, I cocktail waitress at a pretty upscale restaurant and how tacky would it be if I was serving this expensive food and drinks with my ratchet nails. Not cute and not very appetizing. Also, when your nails are on-point, it makes you feel pretty too. 

So these gel manicures were costing me about $35.00 every two to three weeks. (They were only lasting about a week anyway..) As I would watch the woman do my nails, I thought, "I could totally do this." So I did some research, read some reviews, and came across Sally's at-home gel kit. NOT THE STRIPS( I haven't tried those.) I buckled down and spent the $69.99 on a kit at Walgreens, only to see it on sale at Target for $45.00 like a week later. (Totally annoying..I know.) And came home and followed the easy step-by-step instructions.

So, it didn't look as great as Wone (my nail lady) does it, but of course, everything takes a little practice. I couldn't believe how long they lasted and how nice my nails looked. Not to mention, everyone thought I had got them done which was worth the cost to me right there. Although I spent 70 bucks on it, I have already done my nails about 6 times which would have cost me over $200! 

The only problem is with this "starter kit" it only comes with one color. So basically you're stuck with that color until you pay another $10.00 to buy another color you fancy. (Which is STILL cheaper than 35 bucks!)

When you buy the kit, this is what it comes with..


1. Base coat
2. Nail color
3. Top coat
4. 10 cleaner pads
5. Cuticle stick, nail file/buffer
6. Acetone remover
7. LED lamp.

It also comes with instructions. Now, I would walk you through step-by-step of how to complete the process but I'm pretty sure if you're reading this blog, you can read instructions, so I won't bore you ;)

Basically, you do base coat, lamp.
Nail color, lamp.
Top coat, lamp.

Just make sure you do THIN layers of each coat, otherwise the polish will be too thick and will peel off and won't last as long as you would like.

**SECRET TIP** the kit only comes with 10 cleaning pads, but I discovered that it's essentially just rubbing alcohol, so if you have some around the house, you can use that with a paper towel. (or something lint free) 

Removing the gels can be a bit of a pain. It says to apply the acetone to a cotton ball and wrap the cotton and piece of foil around your nails and let it soak until the color melts off. I don't do this and I actually just peel it off, which is probably bad for your nails, but I'm guessing soaking them in acetone isn't the best either :/


I didn't do such a great job the first time, but here is my nails after 8 days!! I kid-you-not! No chips yet!  This is my favorite color also, it's called "Pat on the Black"

I hope you get a chance to try this amazing kit!


Stay classy!
Xx,

Sunday, August 24, 2014

How to Get the Perfect Winged Liner

Oh my goodness, I have been SLACKING in the blogging department. Sorry! Anyway, I have recently been asked by a few people to post a blog about how to achieve the perfect winged liner. I came across this great diagram (better than anything I could ever make) and it's a perfect demonstration of the easiest way to get this look. 


     http://rockettqueen.tumblr.com/post/54267437587/winged-eyeliner-pictorial-steps

When doing your liner it's always important to start from the outside and work your way in toward the eye. (towards your nose) 
1. First make a very small line angled toward the end of your eyebrow.
2. Next connect that line to the outer corner of your eye.
3. After that you can connect that line to the inner corner of your eye and setting desired "thickness"

** the bigger the eyes you have the thicker the line you can can have. However, if you have smaller eyes, then you may wanna make your liner much thinner so it doesn't over power the shape of you eye. I have very small eyes, so sometimes I like to draw my liner in, only to about the  middle of my eye and not drag it all the way in towards the corner of my eye. I think it make my eyes open up more.

Here's an example of how I do my liner.


You can achieve this look using any type of liquid or gel liner that you prefer. I personally use Mac's liquid liner in"boot black" which is a felt-tip liner that lasts FOR-EV-ER! (seriously, like almost a year) 


Some may find it easier to use gel liner and for this I would recommend Maybelline's "Eye Studio." With gel liner the key is to make sure you have a very small angled brush


I believe this liner comes with a brush but if you don't like it then here are some other examples of what you should look for. 


Most importantly.. PRACTICE, PRACTICE , PRACTICE! No one ever gets it right the first time. I, myself struggle to get it perfect but the more and more you play with it, the more it will become effortless. 


Cheers, dolls!
Xx,

Wednesday, July 23, 2014

Look of the Day- Pop of BLUE!

Today's Look is inspired by 9-5'er working woman. Just because you have to work in a cubical doesn't mean you can't look sexy (to a certain extent of course). And oh, you know how I love a "random tee." Especially when paired with a great pencil-skirt and heels. (however, you may not be able to pull off this faux leather skirt at the office. Don't wanna invite too many unwanted stares.) Also, if you invest in some great accessories you can really create an opportunity to jazz up your work attire. You don't have to spend too much either. (necklace from Forever21) A great statement piece like this can make your outfit go from okay to "hot damn, girl!"

 On this day I was really feeling BLUE. The color. Not the emotion. This royal blue is really in right now and goes great with just about anything. Plus, it's super eye-catching! Make getting ready for work fun, and when you look good, you feel good, which can make those stressful work days go by even faster.


Top/Forever21 Shoes/JustFab Purse/MichaelKors Sunglasses/Nordstrom Necklace/Forever21 Ring/CharmingCharlies Skirt/I Can't Remember! :/

Cheers, dolls!

Xx
c


Thursday, July 17, 2014

Look of the Day-Big Hoops, Red Lips, High Heels.

Currently obsessed with these pants! They are very similar to Harem pants (parachute pants) except these aren't as baggy. These are also high-waisted and form-fitted at the ankles. Bottom line-- they are super comfy and can be dressed up with a great pair of heels! It's like a night-on-the town in your jammies. (Please don't ever go out in your actual jammies) The top is a tight crop top that I just tucked in, to give it a more sleek look. You can also wear a baggy tee (tucked in) but I like the more fitted look up top (to keep your waistline visible) with the baggy bottom. 


Pants/H&M Top/Nordstrom Shoes/JustFab Sunglasses/Nordstrom Hoops/Kohls-Daisy Fuentes Lipstick-Wet n' Wild"Cherry Picking"  
Stay classy
Xx,


Monday, June 30, 2014

Fashion Fix- Pencil Skirt OBSESSED


Top Look
I absolutely LOVE pairing a casual tee with a nice pencil skirt! Throw on some great accessories and you're ready for a night on the town. 

Top/Forever21 Skirt/Forever21 Necklace/Forever21 Bangles/Forever21 Ring/CharmingCharlies Purse/MichaelKors Shoes/NatureBreeze Sunglasses/Nordstrom

Bottom Look
Loving floral prints this season! You can even throw on a random tee with your favorite band with this skirt for a great mix n' max of patterns. Also, it may be too warm to rock this look for the summer but the light white coat is beautiful if you live in places that still get a bit chilly at night!

Top/Forever21 Skirt/H&M Coat/H&M Shoes/NatureBreeze Purse/MichaelKors Ring/CharmingCharlies Sunglasses/Nordstrom Necklace/H&M


Stay Classy!
Xx,